
Zippers 101 :: Basic Zipper Pouch

I know there are lots of zipper pouch tutorials on the web, but I still get questions regarding zippers, so hopefully this will be helpful! First up, the basic zipper pouch. This tutorial is for the zipper part only, you can find my other pouch tutorials and buying zipper information here!

First, make your zipper tabs. I like to use them on both side because I think they’re cute, but you could only put them on the closed end if you want. I cut mine to 3″ x 1 1/2″. Fold in half and press. Then open and fold the outer edges toward the middle, with the raw edge 1/2 way between the fold and the center, press again.

Next, sew your zipper tabs to the ends of your sipper. Stitch the zipper closed, then trim to 1/4″ longer than the stitching line. Place the zipper on the tab, but only to the end of the fold, leaving an empty portion of fabric. Stitch along the edge of the tab, I usually back stitch across the zipper a couple times for sturdiness.

Now for the other end of the zipper. I usually buy my zippers all at a longer length, that way they will work for any project, so trim your zipper to about 1/2″ shorter than the width of your pouch. Then add your second tab in the same manner as the first. Now your zipper will be a tiny bit shorter than the width of your pouch.
Note on length: I’ve seen this done a few different ways, I prefer to catch just the edge of my zipper tab in the side seam. This will allow you to easily get a nice corner, without having a little gap between the zipper and the corner, which is what happens to me when I cut my zippers just shy of the seam allowance.
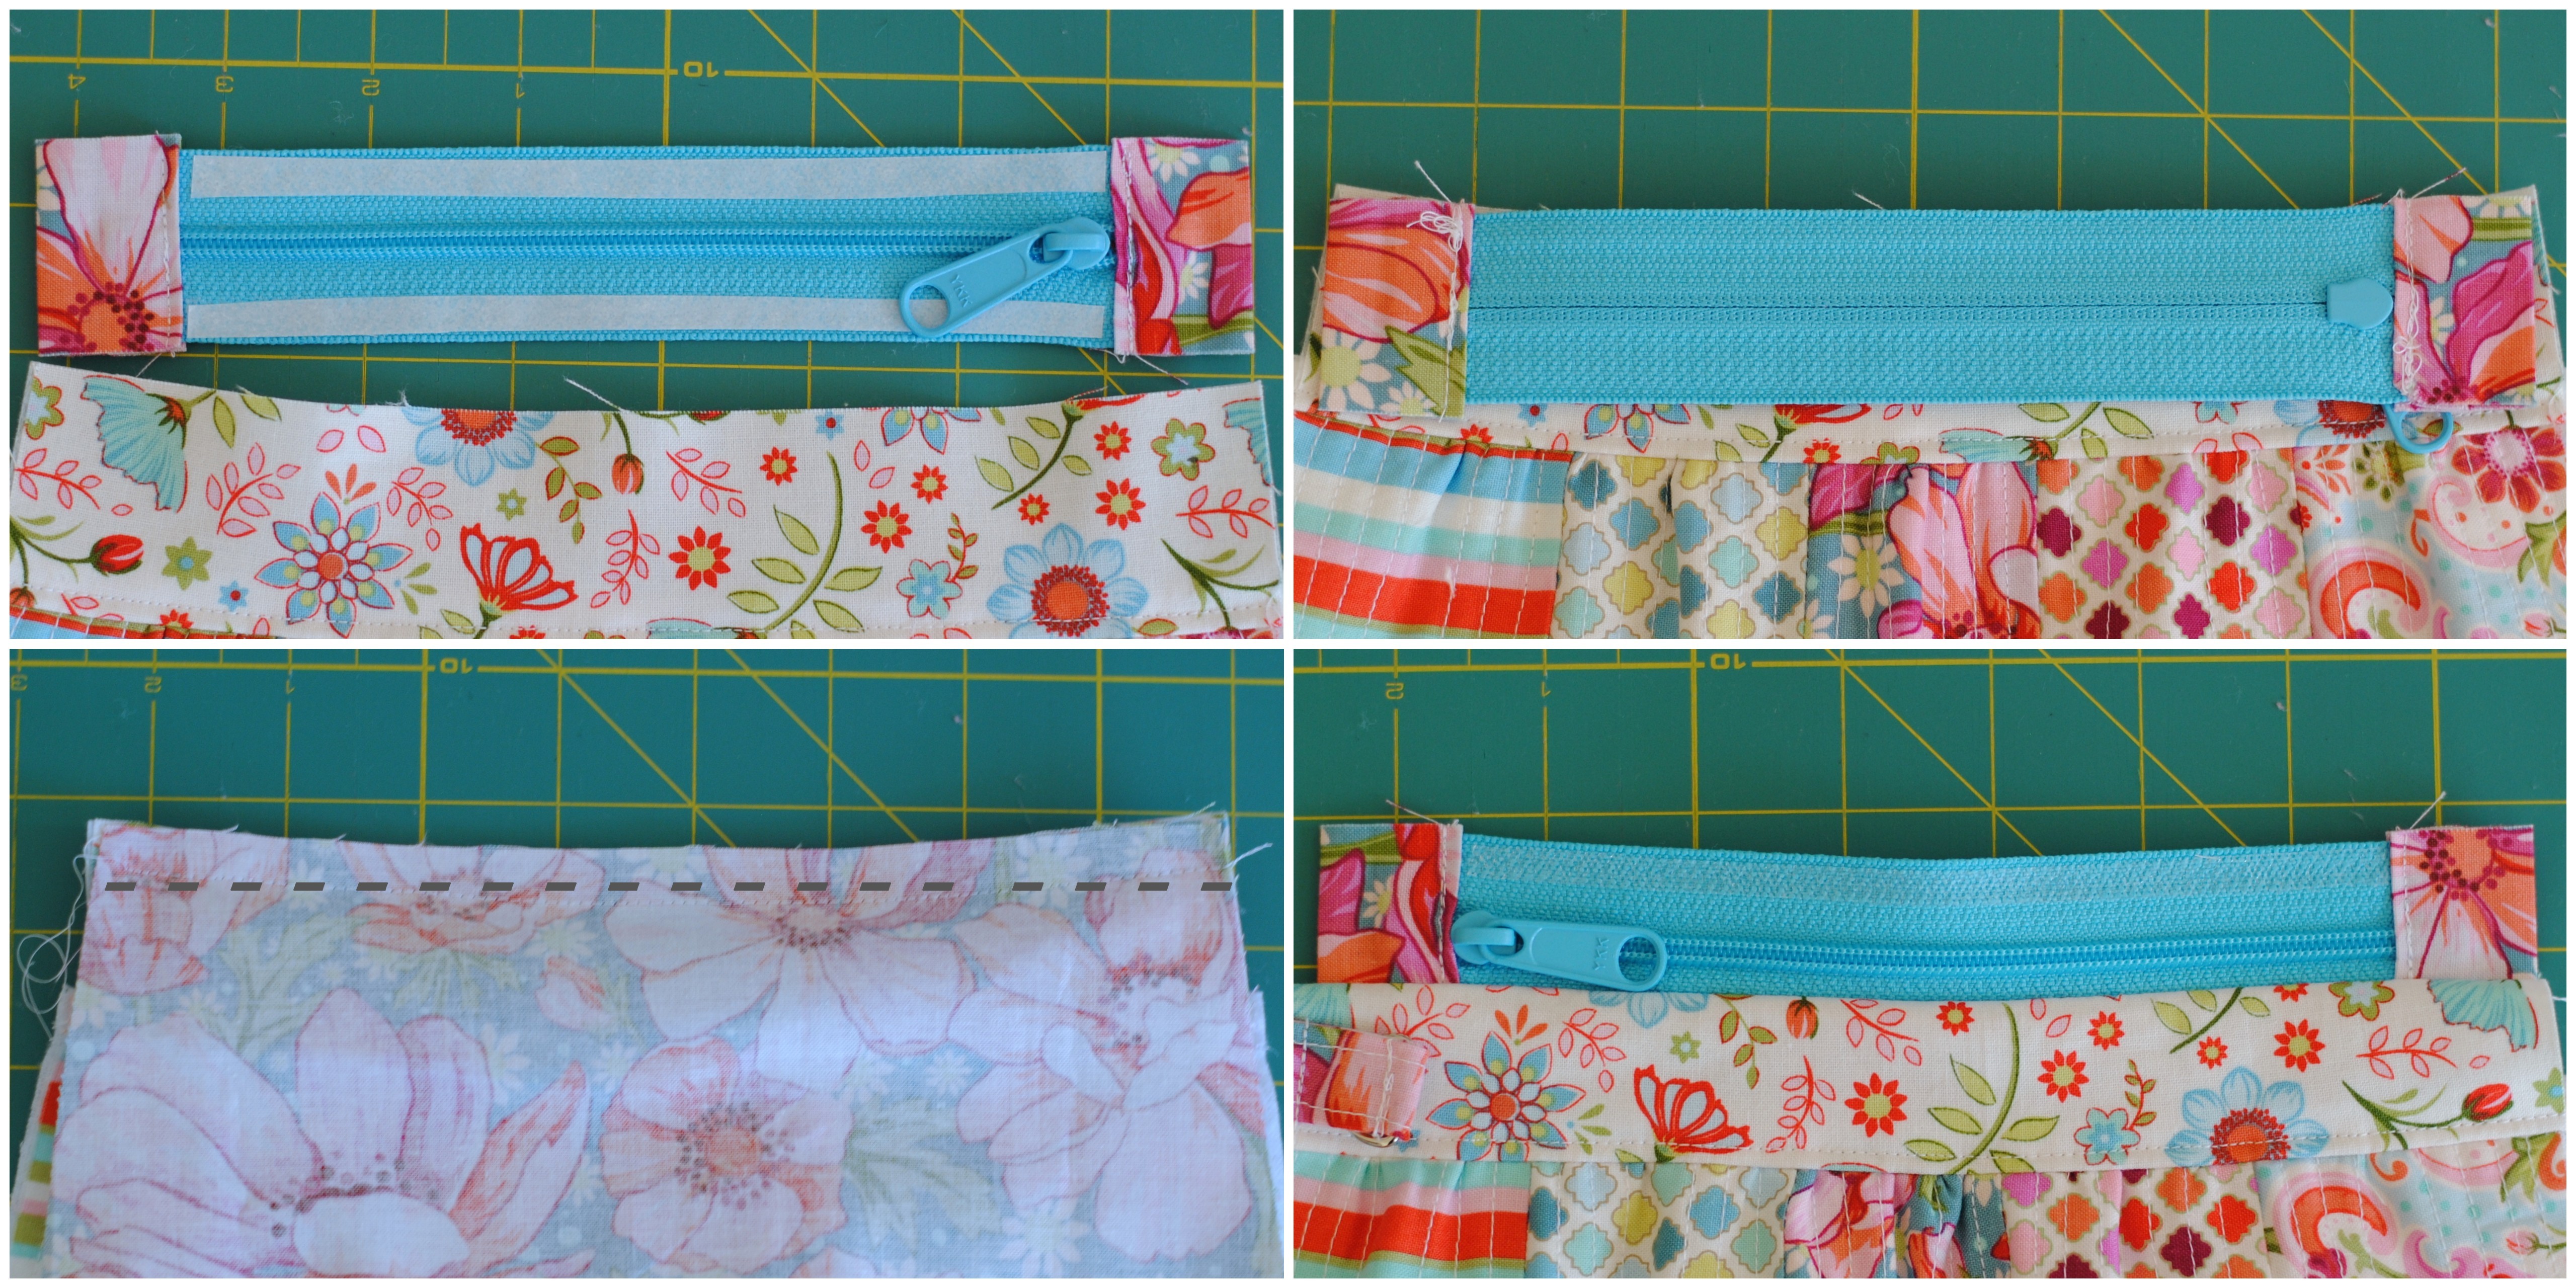
To get the zipper nice and even, I like to use a little bit of fusible tape. I cut it in half lengthwise and then fuse it to the zipper. Peel off only the side you are going to stick and fuse it in place. The zipper teeth should be face down on the right side of the pouch. Then, place the lining over the zipper, right side toward the right side of the pouch, and sew in place using a zipper foot. Since the zipper is fused in place, I find that pins are unnecessary. I usually do not sew incredibly close to the teeth, because then I am often catching the lining in the zipper. Turn the body and lining wrong sides together and repeat for the other side of the pouch.

Finally, to sew the pouch, place the lining pieces right sides together matching up the seams. For the zipper ends fold the seams towards the lining and the zipper tab towards the outside. I like to pin in place. You can see in the lower left picture that the tab is pointing toward the outside of the pouch. Then, sew along your side seam, catching the edge of the tab in the seam. Next, clip the corner, being careful not to clip into the seam line.
Turn your pouch right side out, sew the opening closed and tuck the lining inside the pouch. Carefully push the corners out and you will have a nice, tidy zipper end!


How lovely! I always enjoy making little zippered pouches.
Well done.
I do them the same way! great minds and all that. 🙂 LOL
Thank you. I’m a visual person and I have managed a zipper with these type of ends. Love them. But the pattern was so badly written and nearly impossible to understand. I hope to give this a try very soon.
Thank you for posting this! It’s one of the clearest zipper tutorial I’ve seen…
Jennifer 🙂
So easy, so simple! I’ve just made one puch right now! Thank you!!
Thanks for this great tutorial! I’m pinning this for later. Also… Happy to see you at Tangled Happy today! Thanks so much for stopping over. 🙂
mille merci, je vais finir mes trousses ainsi, cela va être magnifique biz
I hope to master free motion quilting and complete some of my quilt tops. Thanks for the giveaway.
I still don’t understand the other side of the zipper….
Thanks for giving me the confidence to have a go..
Hi,
I am trying to make the Bella pouch and am having a hard time understanding how to put the second side of the zipper in. I understand if the bottom wasn’t already sewn together, but since it is, I just can’t wrap my head around it. Do you have any other pictures or tips?
Thank you,
Stacey