
Not Your Average Nursing Cover (tutorial)

Here is my tutorial contribution to the Welcome Baby series. Before I had Silas a nursing cover was high on my priority list of things to own for a baby. I bought one from a shop and loved it, at first. The more I used it, the more I thought of ways I would like to tweak it, to make it really perfect for me. The biggest addition to this cover is the second strap, it is positioned lower and when draped over the shoulder will help keep the cover in place, even with a wiggly baby {with my previous cover I found myself sitting with the corner pinned to the chair to keep myself covered!}. Enjoy!
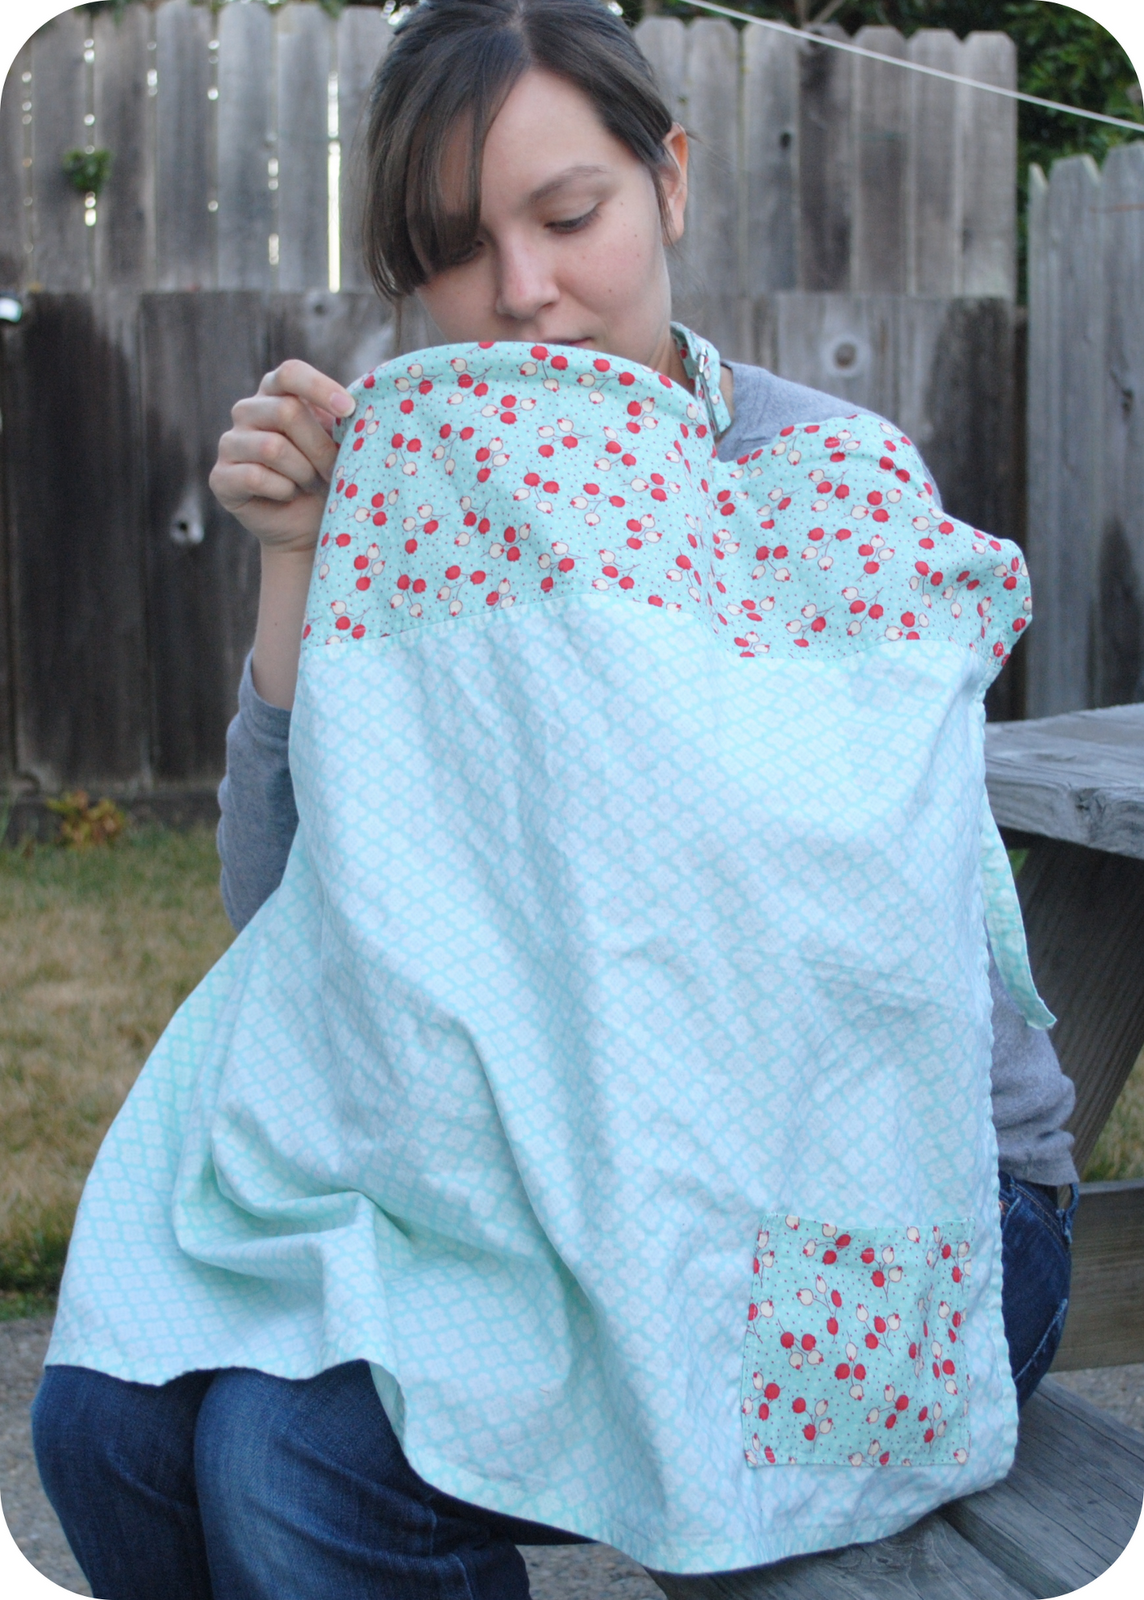

For the nursing cover with the contrast piece on top, you’ll need 3/4 yard of body fabric and 1/3 yard of contrast fabric. If using just one fabric, you’ll need about a yard. {And yes, there really is a baby under there…}
Read all directions before beginning. Cut the following pieces {note: WOF = Width of Fabric}:
Fabric A (body):
- 1 – 20″ x 36″ for body
- 2 – 2″ x WOF into
- 2 – 2″ x 30″ for ties {tie size may need to be adjusted based on the size of wearer and personal preference, I ended up trimming mine down to 18″ so there was no extra.}
- 1 – 2″ x 12″ for Velcro loop
Fabric B (contrast):
- 1 – 8″ x 36″ for top
- 2 – 2 1/4″ x WOF into:
- 2 – 2 1/4″ x 30″ for neck
- 2 – 2 1/4″ x 7″ for neck
- 1 – 7″ x 8″ for pocket
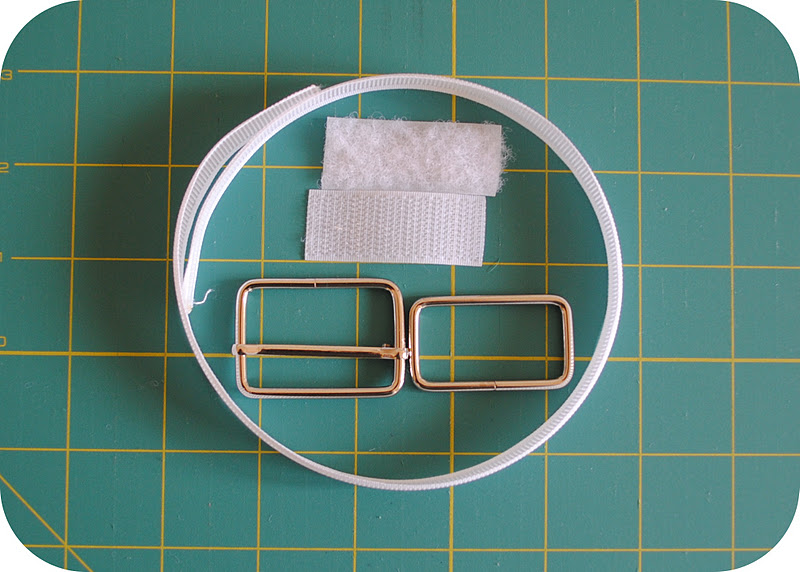
Other supplies: 12″ of flexible boning {can be bought by the yard from your local fabric store}, 2″ of Velcro, and a 1 1/2″ set of rectangle strap slider and rectangle ring for the neck strap.
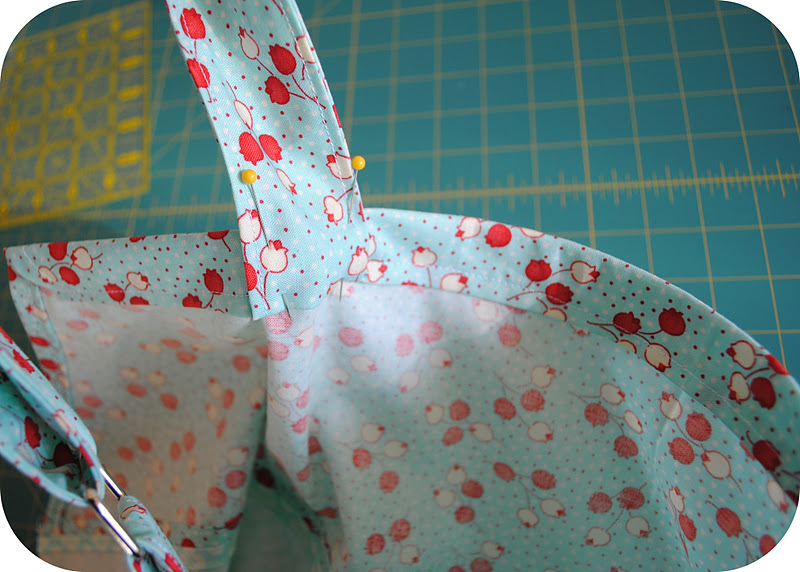
Note: For this cover, I’ve replaced the D Rings with a sliding strap. While the D Rings are on almost every nursing cover I’ve ever seen, they did not work for me, they constantly slid out of place and got tangled up, I ended up just tying a knot it the strap. Also, I did not like the tail of the strap hanging down. The sliding strap solves both of these problems.

Begin by sewing the 8″ x 36″ piece to the 20″ x 36″ piece with a 1/2″ seam allowance. Press the seam open and turn the raw edge under, top stitch in place. The piece should now measure about 27″ x 36″, if using only one piece of fabric, omit this step.
Note: I found that the top corners of the nursing cover didn’t have any benefit, so I’ve removed them. I thought this made it look a little more like an apron, not just a sheet.

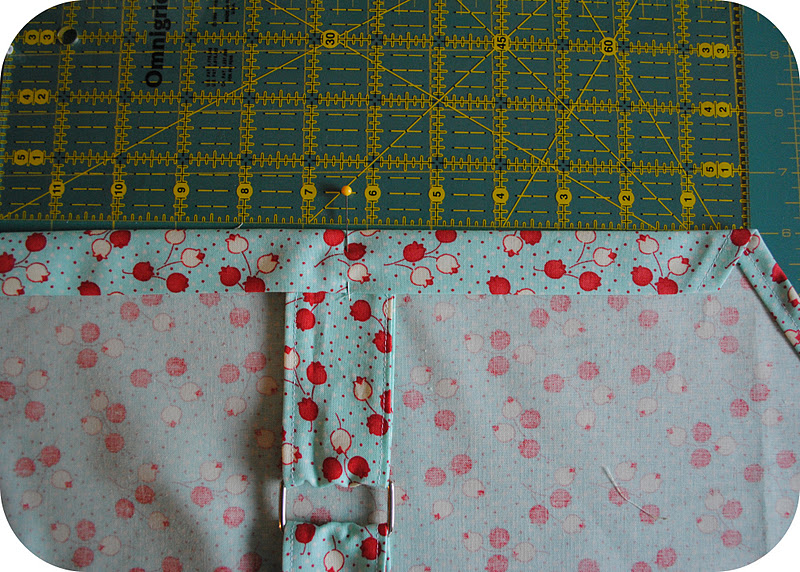
Next, set the main body aside and make the neck strap. Cut the two 2 1/4″ x WOF into two 2 1/4″ x 30″ for the adjustable slide neck strap and two 2 1/4″ x 7″ for rectangle ring side. Sew the two sets of strips right sides together, then turn inside out. Turn under one end of the 30″ long strip and stitch in place.
Wrap the end around the center bar of the sliding rectangle and stitch in place. Slip the other rectangle onto the strap. Fold the long end around the rectangle and over the center of the sliding strap. Set aside.

Next, create a casing at the top of the body by folding 1/2″ under, pressing, and then folding another 1″ under. Pin in place.
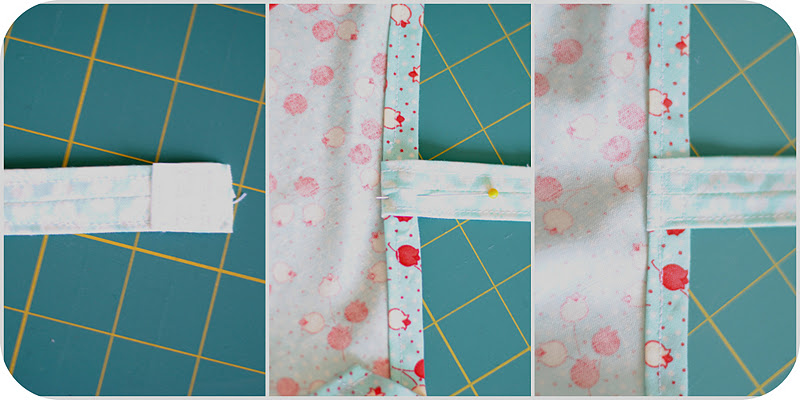
Measure about 5 1/2″ from each edge and pin the straps in place under the casing. The front of the strap should be facing out.
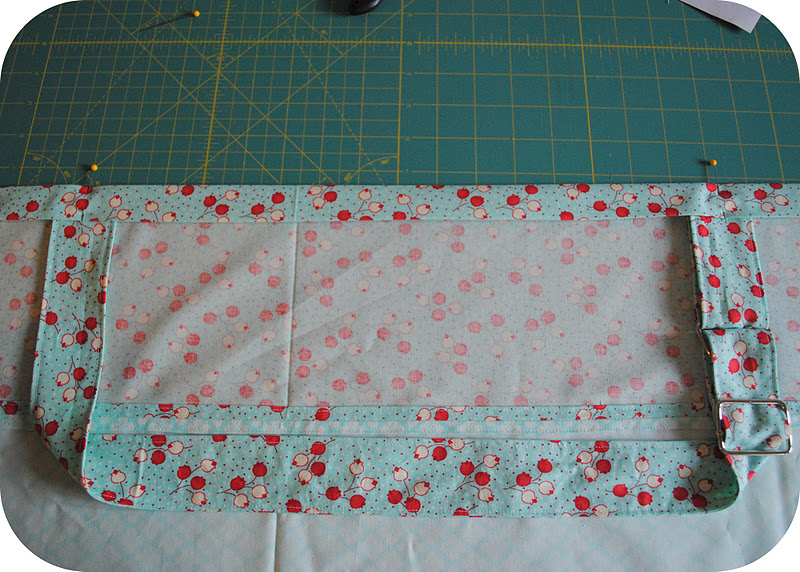
Stitch the casing closed and stitch the straps in place. Next, feed the boning into the casing,

Fold the straps up over the casing and pin them and the boning in place.
Stitch the straps and boning in place simultaneously. You should be able to stitch through the boning if you’re using the webbed-type boning I am, if not, secure the boning according to the manufacturers directions.
Using two 2″ x WOF strips, create the ties. Fold the strips in half, right sides together, then sew 1/4″ from edge, press the seam open. Then turn the tubes right side out {in the photo is a picture of my nifty turning tool, makes it much easier! Another option is to use a safety pin to turn it right side out}. Press flat with the seam in the center and top stitch 1/8″ from the edge.

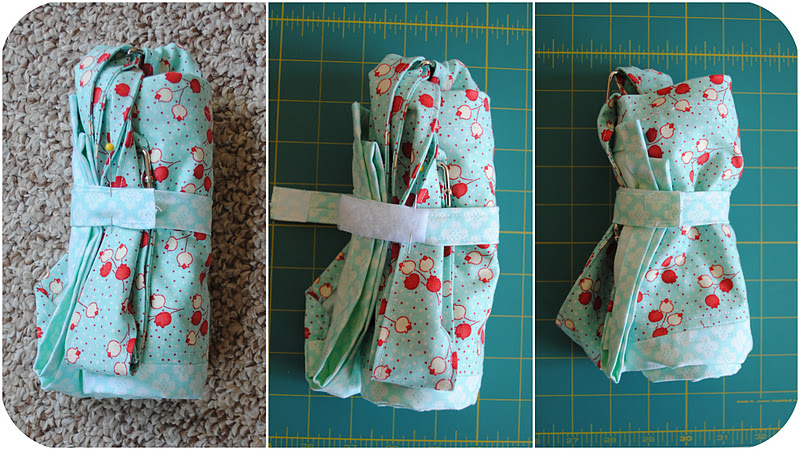
Sew a square of the hook side of the Velcro to the end of the 12″ strap. This will be used to keep the nursing cover rolled for storage. Hem the angular sides of the nursing cover by folding 1/2″ and then folding a second 1/2″. Tuck the strap under the center of the angled edge and stitch in place as for neck strap {I put mine on the left side of the wrong side of the nursing cover}.
Use the remaining pieces for the long ties and position at the seam of the upper and lower portion on the straight side of the nursing cover.

Note: I made my straps out of one 2″ x WOF strip because I only wanted them to be 18″ long each, and they tie together in the back with just a small amount of excess. These straps are sewn to the upper side of the body of the nursing cover {see next photo}. These straps will fall around the shoulders of the wearer. I found that as my little one got bigger and more curious he tried to pull or kick the nursing cover aside. I often sat with one shoulder up against the chair to pin the side of the nursing cover back. These straps will hold the cover in place. The length will vary depending on the wearer, but if they are kept shorter they will not create much extra bulk when the nursing cover is rolled up.
Hem the bottom of the nursing cover as sides. Add the optional pocket by hemming the 7″ x 8″ rectangle of contrast fabric to 6 1/2″ x 5″. Sew it to the right side of the nursing cover 1 1/2″ from the side and bottom. Note: My original nursing cover came with a terry cloth pocket sewn into the corner on the wrong side. The claim was that it was to store nursing pads or be used to wipe baby’s mouth. However, it was hard to get to and small for a pocket, and I didn’t want to use it to wipe baby’s mouth as the entire nursing cover would need to be washed. Therefore, I’ve replaced it with a contrast pocket on the outside that is large enough for a small burp cloth or nursing pads.
To roll the nursing cover, fold the side without the extra tie over to the neck strap. Then fold the bottom up to meet the top edge, and fold in half in the same manner again.

Then, starting from the folded edge, roll the nursing cover. Wrap the closure strap around the cover and mark the spot for the loop side of the Velcro. Stitch the Velcro in place and the nursing cover is compact and ready to go!

If you make one, we’d love for you to share photos to our Flickr group too!

Beautiful!! Thank you for visiting Crafty Moms Share the other day. I love your tutorials and projects. Wish I had them when my almost 3-year-old was younger. Thank you for your kind comment.
Great nursing cover Jennie, thank you.
Awesome! Thanks!
Do you have a picture showing how it looks on a person? I would like to see the corners you took off.
That looks great. I might have to make a gift. =)
I don’t know anyone expecting right now (except you of course) but I will keep it for future reference. It is a great tutorial – much better than some of the others I have seen.
Hi There,
Was looking at this tut and hoping for a better photo–perhaps on a person to see how it looks on–
Thank you!
@A.J. Dub. & @J,
Hi ladies, I’m sorry I don’t have a photo of it on a person because I haven’t had the baby yet and it doesn’t quite look the same pregnant! However, as far as basic dimensions and fit, it is like most other nursing covers. I just tweaked the style to make it fit my needs better! {I’d like to promise a better photo soon…but can’t really!}
I HAVE SEEN ONE OF THESE BEING USED…THE ARE REALLY NEAT AND INTEND TO MAKE SOME…REALLY IS NEAT AND THANKS FOR SHARING…
I love this pattern, thank you! I was thinking the double D rings wouldn’t hold and I like the tie up strap with velcro. I’ll be making this tomorrow 🙂
Hi, I am keen to make this but can’t visualize the second set of straps. I see that there is an insertion point on one side near where the patterns contrast but is there another one on the opposite side? If so it is at exactly the same height?
Thanks