
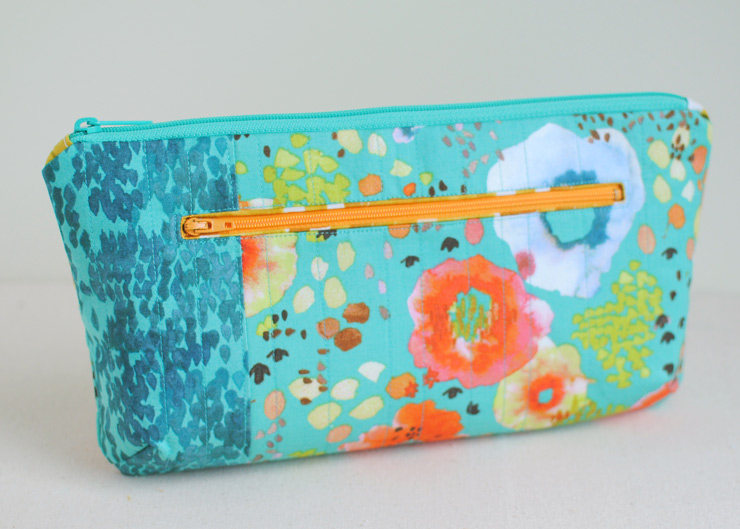
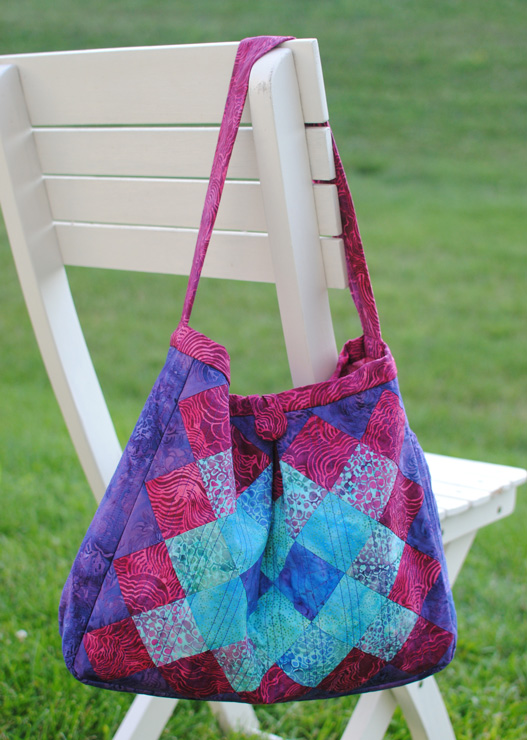
The Poppy Clutch :: Free Pattern
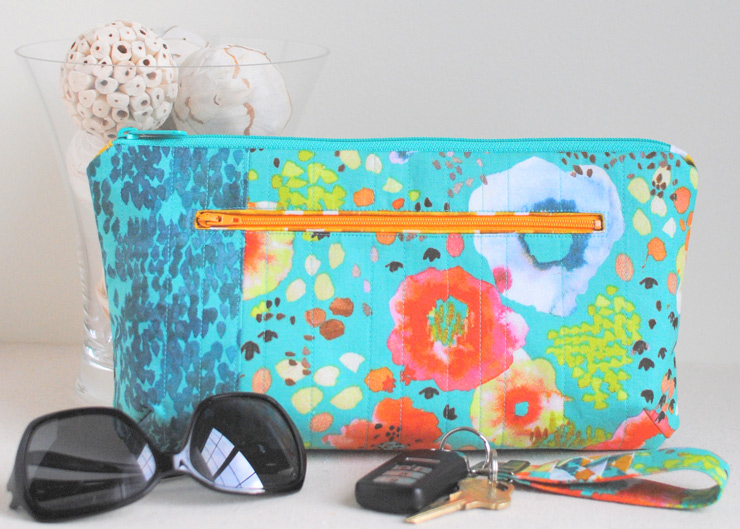
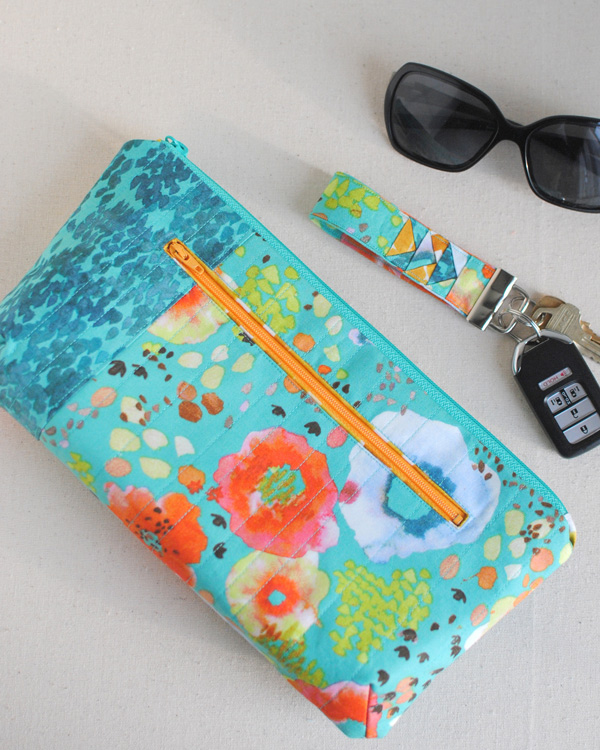
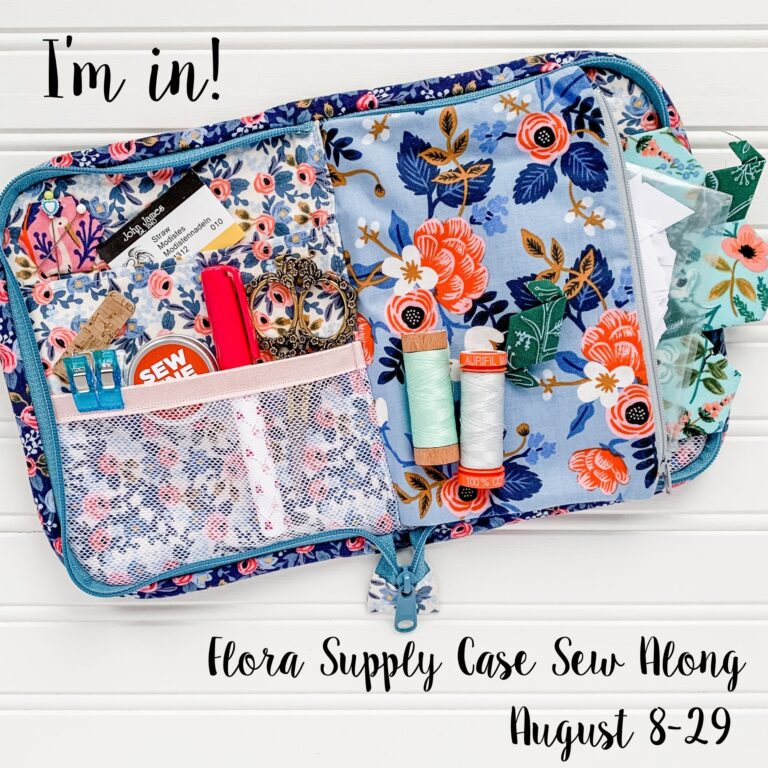
This week I’m excited to share the Poppy Clutch as part of the Windham blog hop for Kelly Ventura’s debut line of fabric, Flora. When I saw the fabric, I knew it had to become a pretty clutch, and would be perfect for those rare occasions I actually escape the house! I added a zipper detail to the front to keep things like my phone separate, so I could easily grab it, and because exposed zippers are just so pretty!
Looking for a downloadable version?
We know you may want a printable, download version of our popular freebie! You can grab it in our shop here: The Poppy Clutch PDF Pattern.
Take a look at the Poppy Clutch
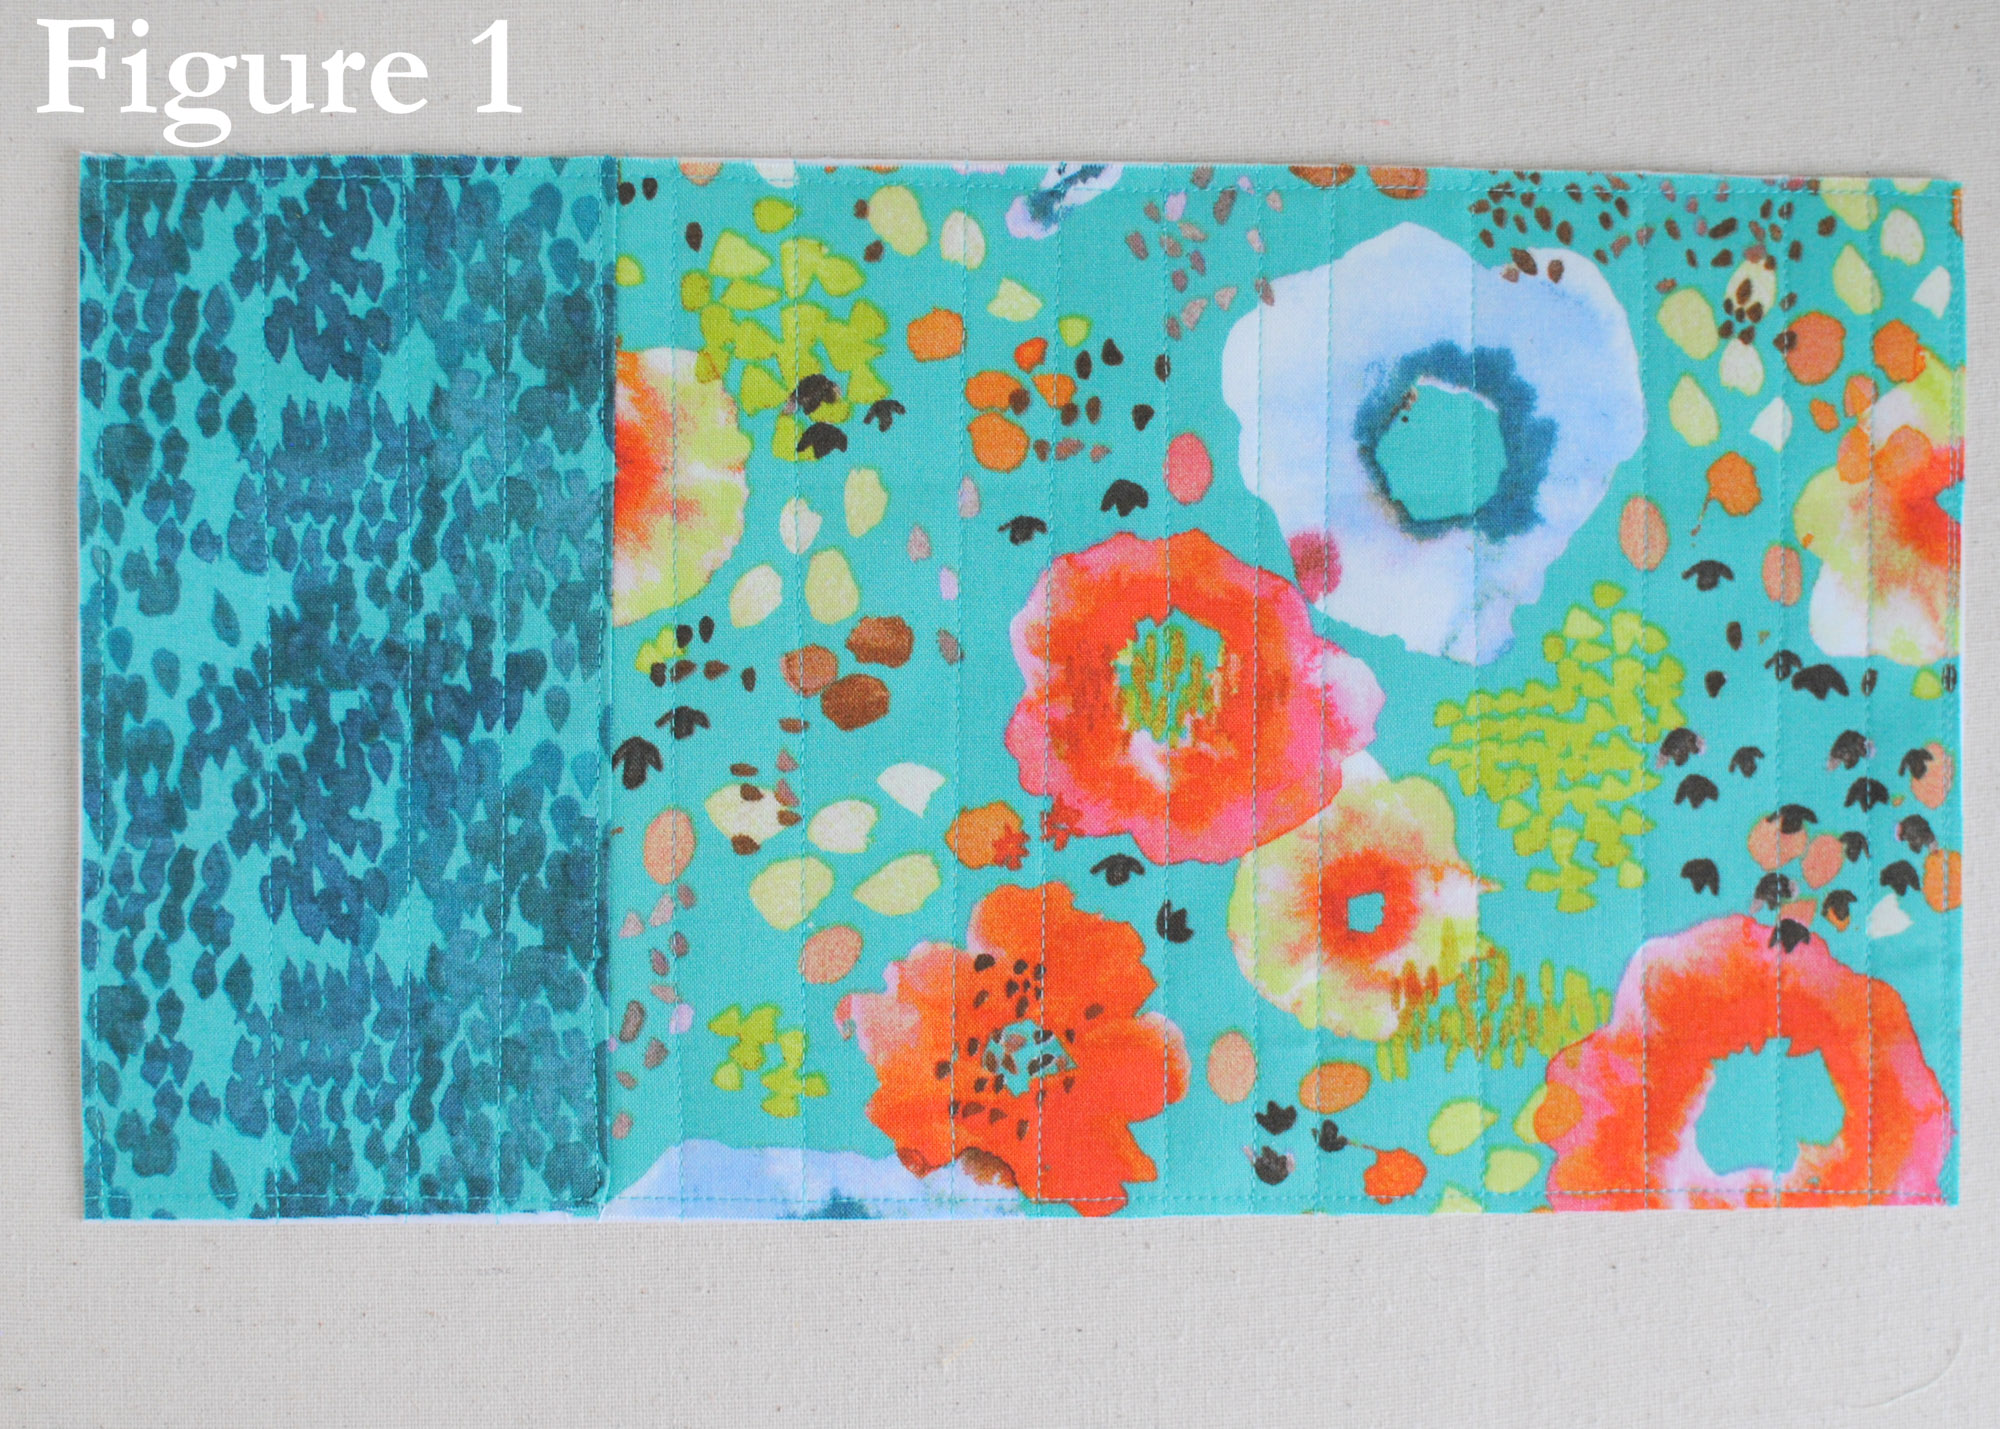
Quilted Body:
Sew the body accent piece to the left of the main body piece. Following the manufacturer’s instructions, fuse the body interfacing to the wrong side of the body. Place the body flannel on the wrong side of the body piece and quilt as desired. We quilted in randomly placed straight lines.
Repeat with second body piece, sewing the accent to the right side of the body.
Front Zipper Pocket
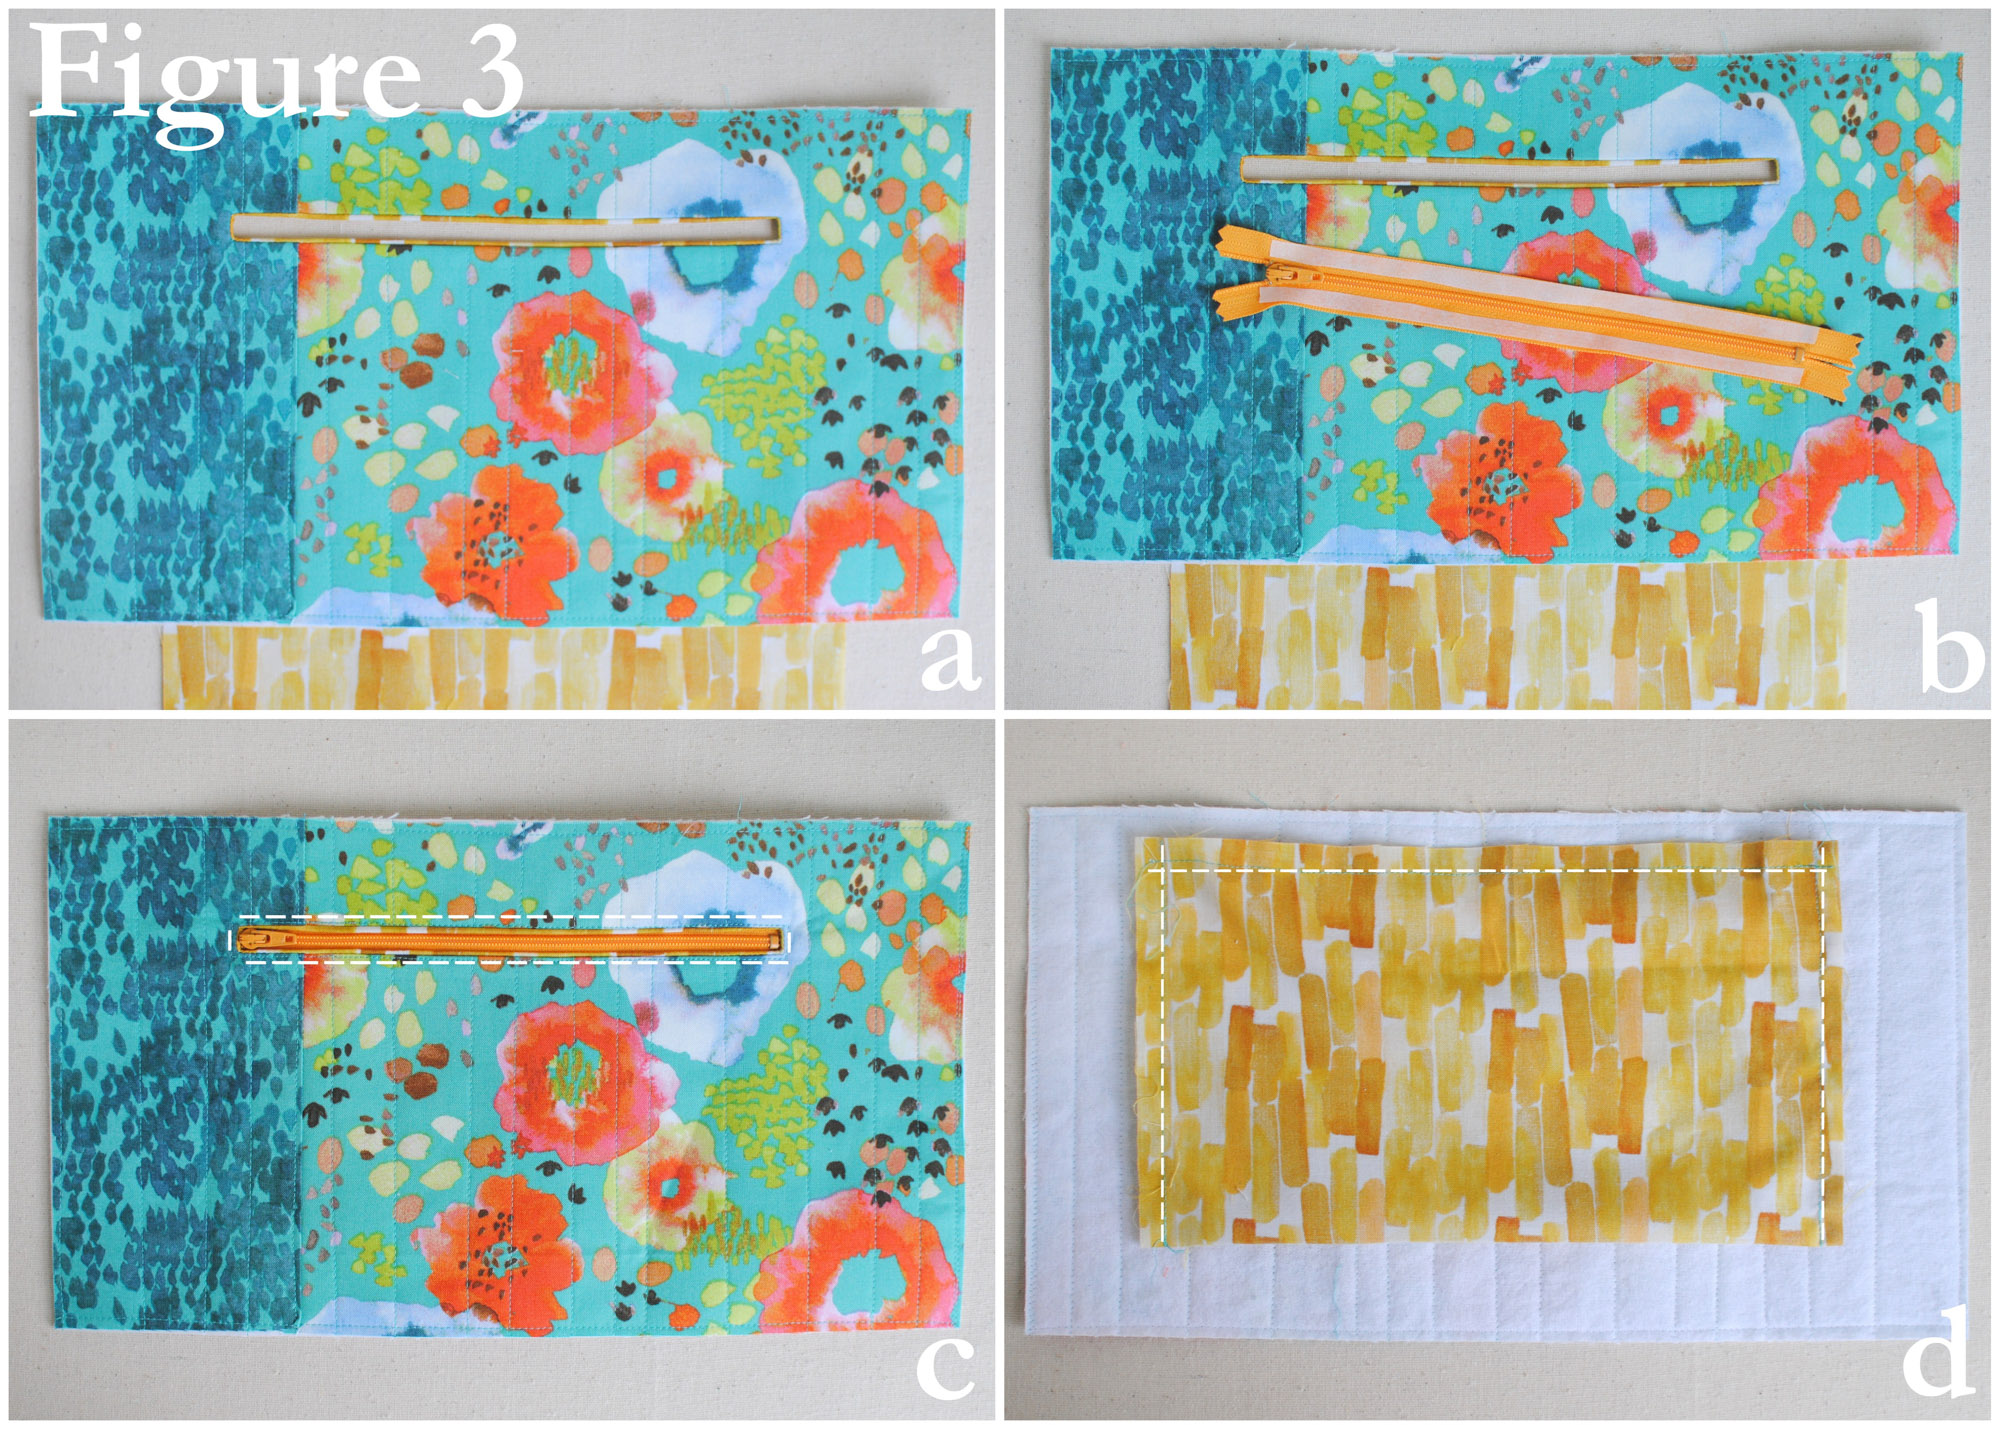
Draw an 8” x 3/8” rectangle on the wrong side of pocket piece 1” below and centered on one 10” edge. Pin pocket piece, RST, 1/2” from the top of the body piece (Figure 2a). Sew around the rectangle through the pocket piece and the body (Figure 2b). Cut a straight line ¼” from each short edge of the rectangle and then clip towards the corners (Figure 2c). Push the pocket fabric throughthe opening (Figure 2d). Press thoroughly to create a window for the zipper (Figure 3a). For an added accent, we allowed some of the zipper pocket fabric to show through the window. This allows for easier pressing and gives an added feature.
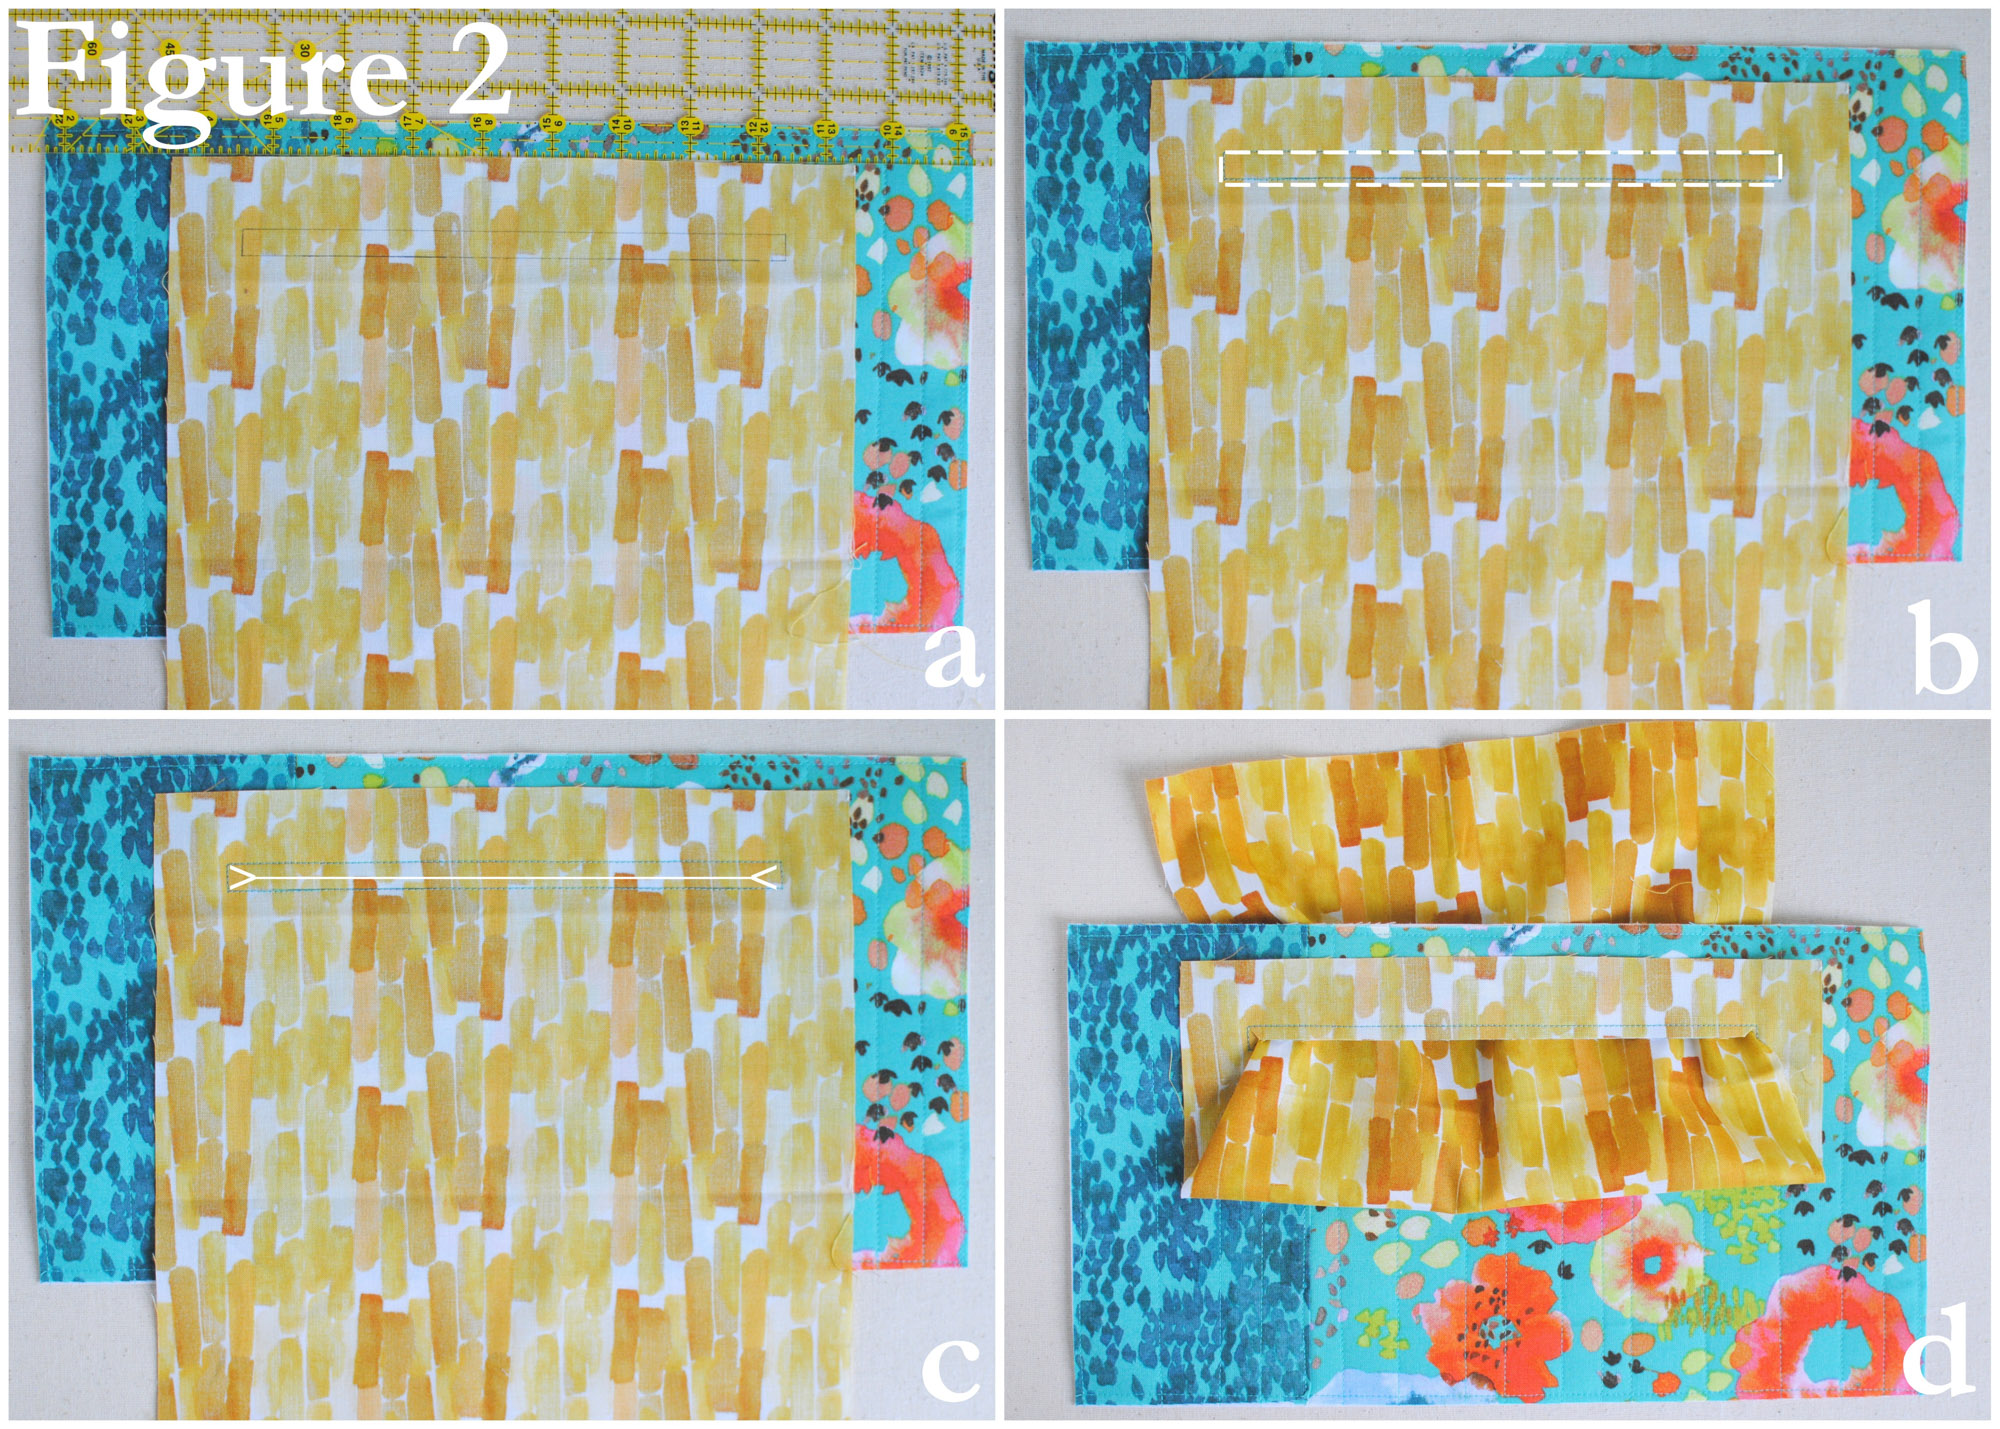
Place the zipper in the opening, and fuse or pin in place. Using a zipper foot, on the front side of the body, sew next to the opening to secure the zipper in place, double stitching the ends (Figure 3c). Turn the body piece over; trim the zipper to width of pocket if necessary. Fold the pocket piece in half and pin. Carefully stitch along the top and sides of pocket, making sure not to stitch through the body (Figure 3d).
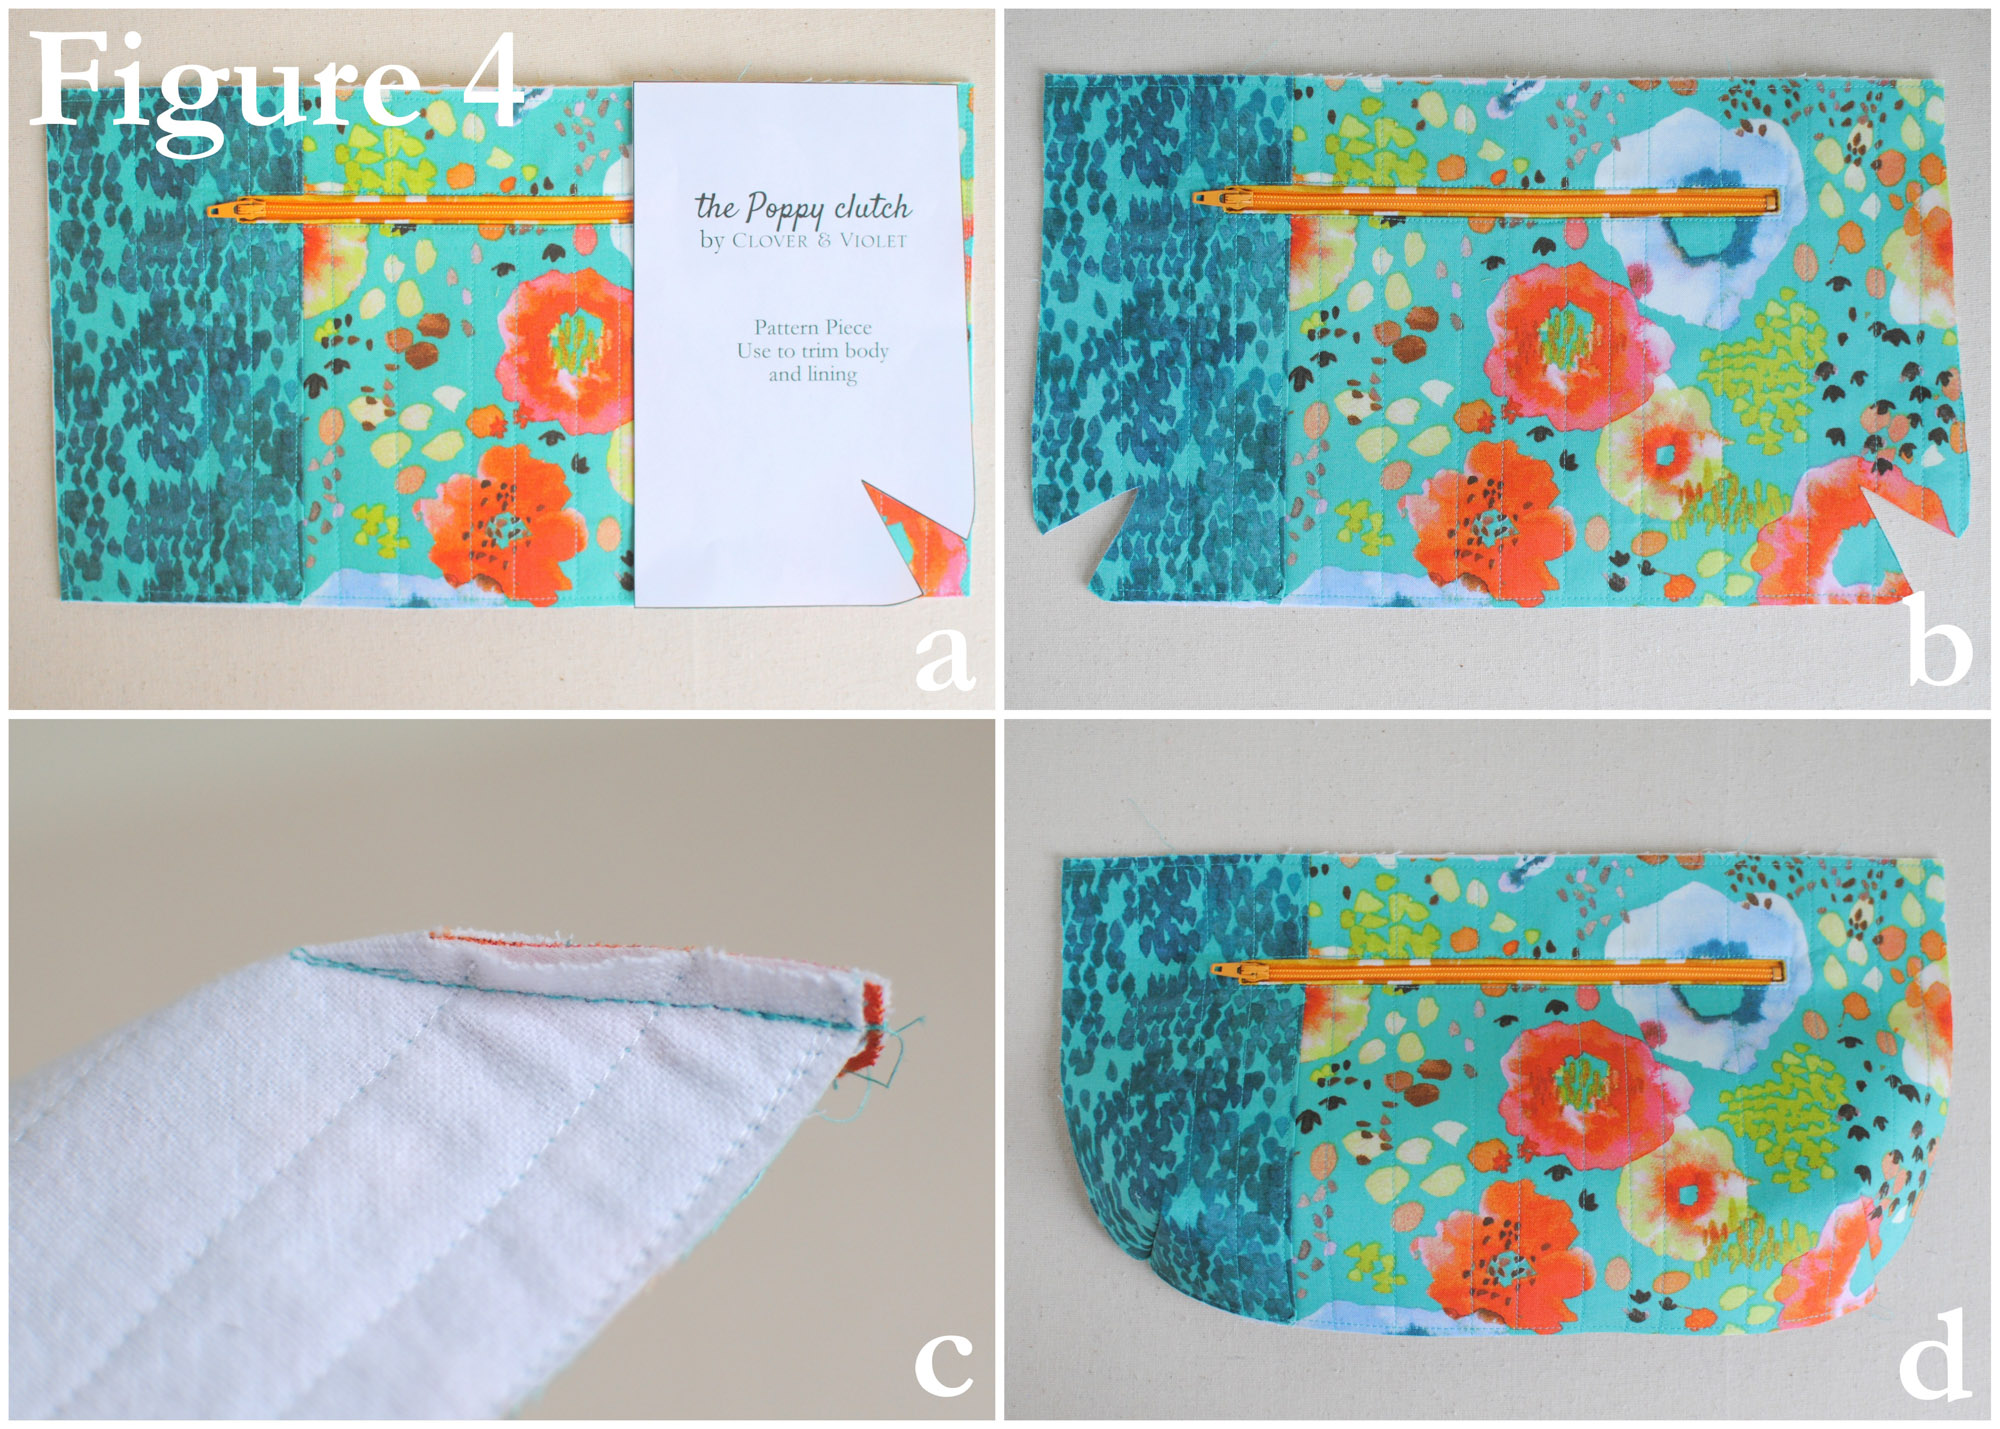
Shape Body and Sew Corners
Line the top and bottom of the pattern piece up with the top and bottom of one side of the body piece (Figure 4a). Trim the side and curve, and then reverse the pattern piece to trim the other side of the body (Figure 4b).
Fold the corner along the cut “V” and sew with slightly less than a ¼” seam allowance (Figure 4c). Repeat with the second side of the body piece to shape the corners (Figure 4d).
Use the same method to trim and sew the corners on the second body piece and both lining pieces
Insert the Top Zipper
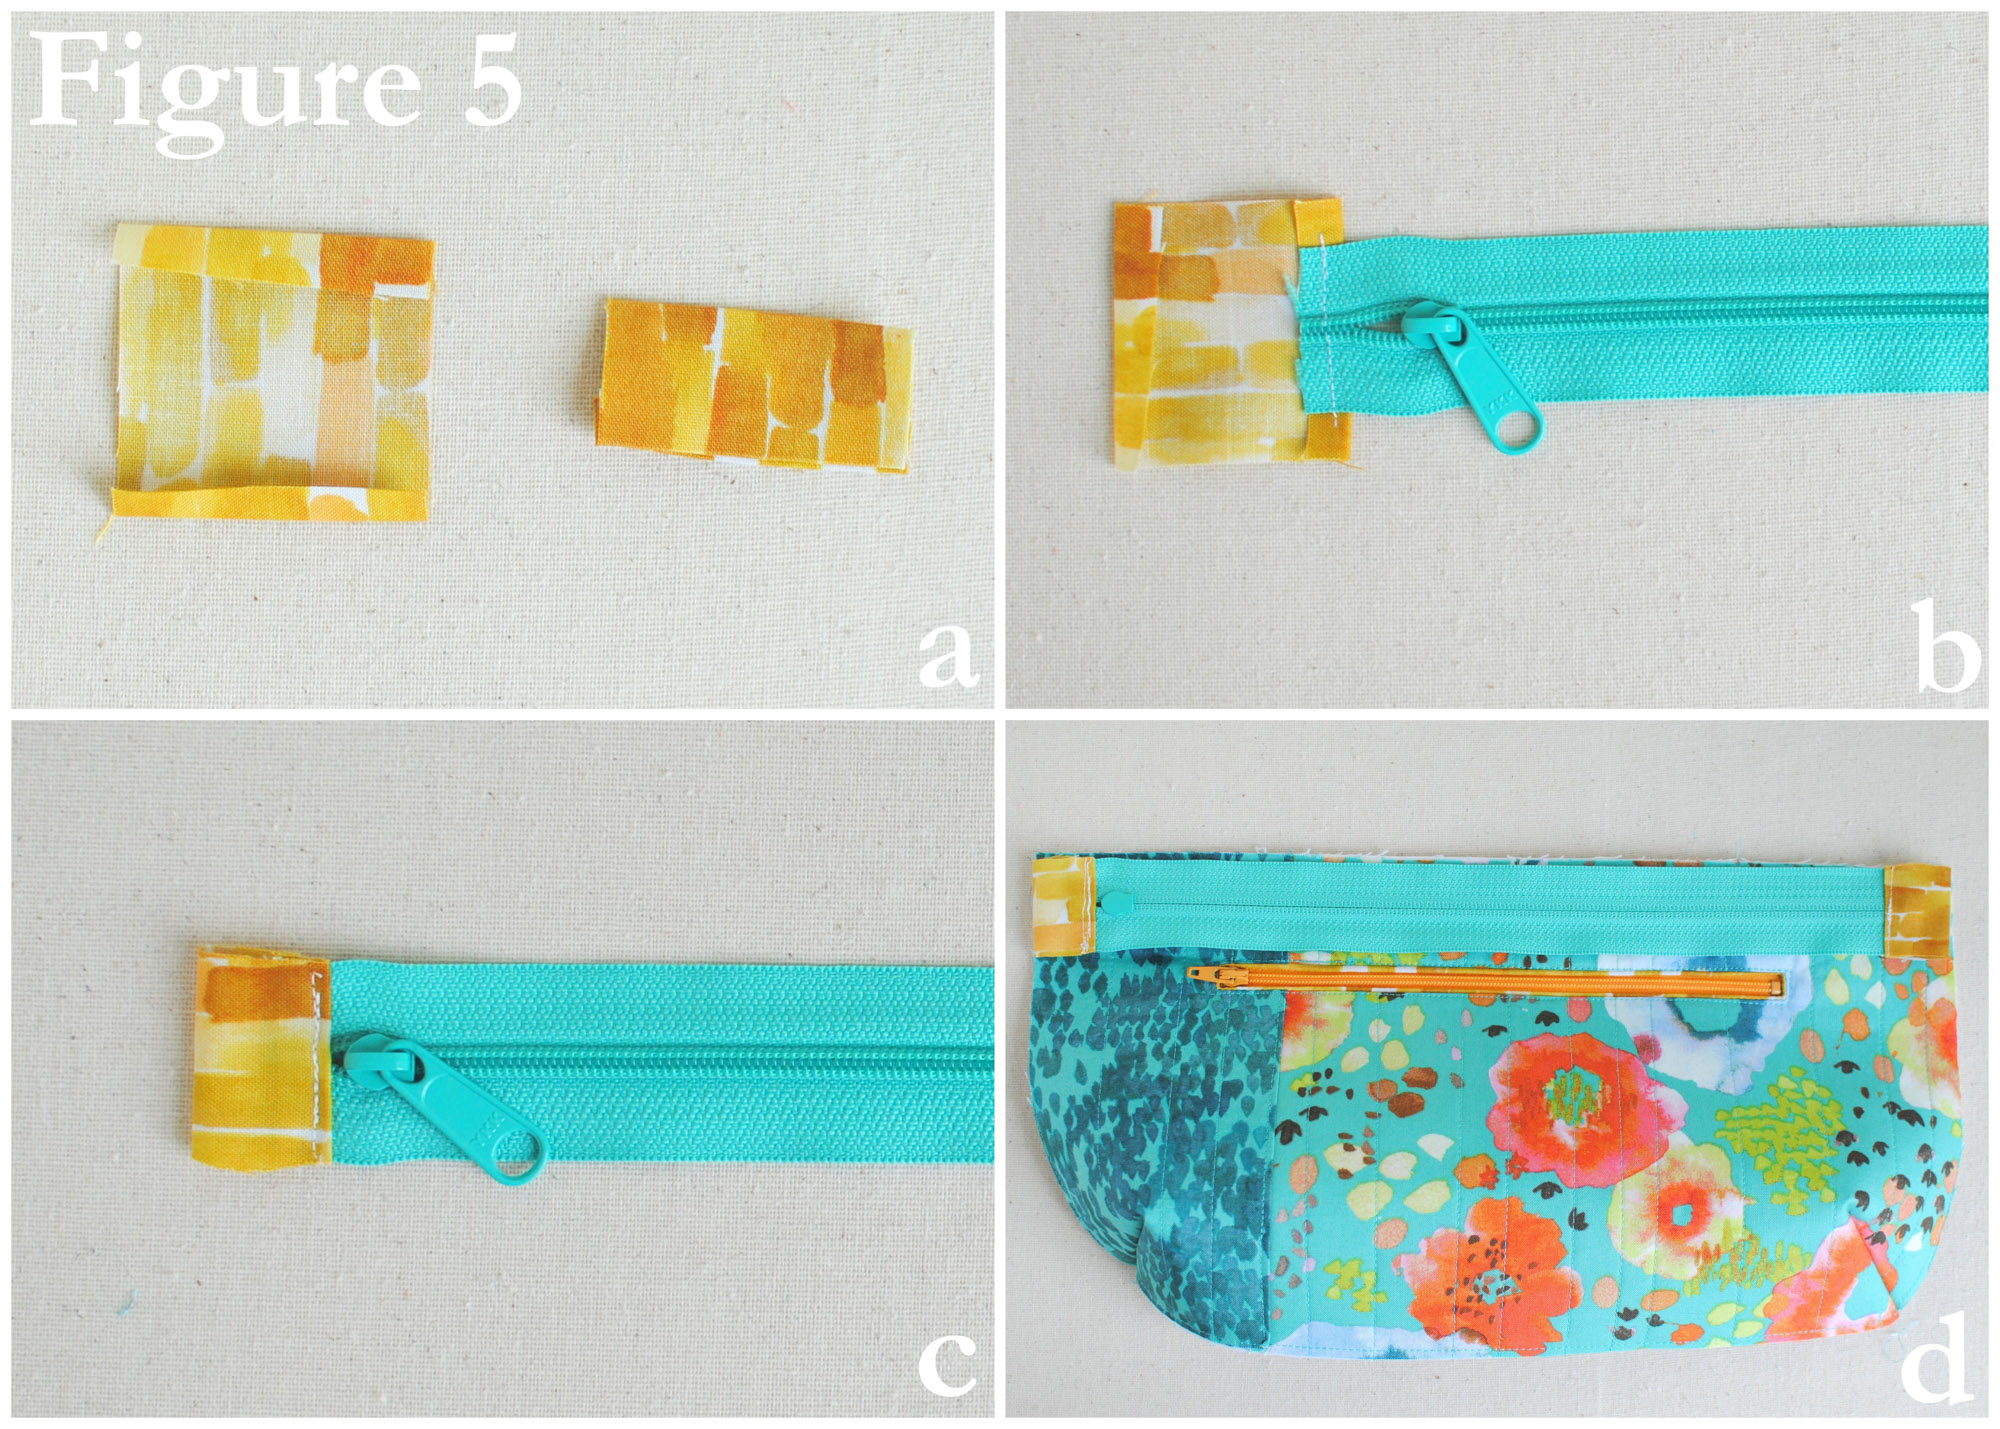
Fold the two zipper tabs in half (1 ¾” x 2”), wrong sides together, press. Then open and fold the short edges ¼” toward the center (Figure 5a). If necessary, trim the zipper to ½” shorter than the width of the top of the clutch (approximately 12 ½”). Place the zipper end so that it extends 3/8” past the fold of the tab, but not all the way to the center (Figure 5b). Sew the tab over the edge of the zipper and trim to zipper width (Figure 5c). Repeat for other zipper end.
Place zipper face down the body piece with the zipper pull on the left (Figure 5d). Place one lining piece RST on top of the zipper. Sew along the top edge. Turn pieces right sides out.
Press thoroughly or top stitch the zipper to the lining to prevent the lining from getting caught in the zipper (Figure 6a – see below).
Place the front body piece on the back body piece, RST (Figure 6b – see below). Lay second lining on top of zipper. Sew in place as for first zipper side.
Construct the Bag
Fold bag so the patchwork is RST and lining is RST together. Make sure the zipper is partially unzipped before sewing. At the zipper tabs, fold the tab toward the body and the raw edges toward the lining (Figure 6c). At the corners, press the seams so they are in opposite directions and nest together (Figure 6d). Press the seams on the piece with the pocket away from the pocket (Figure 7a). Sew around the outside and leave a 6” opening along bottom of lining (Figure 7b).Trim the seams next to the zipper. Turn the bag right side out and stitch opening in lining closed (Figure 7c). Tuck lining inside bag and enjoy your new clutch!
Terms of Use:
This pattern is for personal, non-commercial use only. If you wish to sell items made from this pattern, please contact us to purchase a license. Thank you for supporting our business.

I love the pops of reds and golds with the bright turquoise, so I was glad I happened to have a goldenrod colored zipper in my stash.
I really love the wearable aspect of this fabric too, whether for a clutch or even clothes {there are some on the Windham blog, and this fabric even comes in a cotton lawn!}, it’s perfect for summer or fall {the golds and reds are amazing too!}.
Get a Printable PDF of the Tutorial
The Poppy Clutch is perfect for an evening out, a quick trip to the store, or carrying some on the go essentials in a larger bag. It is large enough to still fit a wallet and other accessories. The front features a zipper pocket to keep important items separate from the inside.
And, if you make a Poppy Clutch, I’d love for you to share it on social media using the hashtag #poppyclutch and tag me @cloverandviolet on Instagram.

Your inset zippers look great. Thank you for the tutorial. I would have to make a quillow with the beautiful bundle.
BEAUTIFUL fabrics!!! Thank you for a great tutorial too!
I love the way that you used this beautiful fabric in your delightful clutch. I’m definitely making one for myself. Thanks so much!
I love the watercolor look of the fabrics & you clutch is too cute
Awesome! That is the cutest little clutch! Can’t wait to try making one! and the fabric is just gorgeous!
Awesome project! I can’t wait to try it! I would love to make a patchwork purse with the fabrics.
The clutch is very cute and the fabrics are fantastic! Looking forward to giving this one a try! 🙂
Very nice! The fabric is perfect for this project. Thanks for another wonderful tutorial.
What a lovely clutch! Prettier than anything you would find in a store!
My grands will love this for Christmas. Is it okay to make for a lesson in ASG? I will give them the blog address.
and you definite will get the credit.
Jenny! This little clutch is so pretty! I love the fabric! Turquoise and orange always excite me. You did a lovely job and I am looking forward to making one of my own. XOXO
Love the pop of color the zipper makes; changes a functional thing into a design element with that gorgeous fabric!
Love your little clutch. The goldenrod zipper is perfect.
Fantastic bag. I know that I will be making lots of these! Thanks
This is such a cute little clutch – would make perfect Christmas gifts. Thank you for the tutorial.
I would make a quilt or a bag to organize quilt projects.
GORGEOUS FABRIC! I would make the poppy clutch of course!
Adorable clutch…love the colorful zipper…adds a great touch!!! Thanks for the tutorial :o)
Thanks for the tutorial
I love the outside zipper.
Thanks for the tutorial. I could make lots of clutches if I win the bundle.
Lovely clutch! It will make great little Christmas gifts using the fad giveaway bundle-at least that’s what I would do with the Flora fat quarter bundle.
lovely tutorial as usual can’t wait to try it. i love the fabric you used for the clutch it’s really pretty.
The clutch is so cute. Thanks for the tutorial.
Love all your patterns
Waiting to try
It is so lovely! Can’t wait to make my own.
Very sweet Jennie! I would make one just like yours for my DD. Thanks for the pattern!
What an adorable clutch and the fabric is gorgeous! Will definitely be making this. Thank you.
Gorgeous fabric & perfectly matched to the clutch pattern. This is a winner for sure. Thanks for the tutorial, it’s on my to do list 🙂
Cute, cute, cute! Definitely will try this one! Thanks for the fun patterns!
Great tutorial, and lovely fabric, too! Thanks for the pattern!
Beautiful fabric and clutch! Thanks for the giveaway and pattern!
Beautiful bag! The colors in the fabric are so vibrant!
I would make a patchwork clutch and tote bag to match.
Your goldenrod zipper has inspired me to try an inset zipper!
Oh Boy I might actually get this one made!!!
This fabric is so lovely. It makes such a beautiful summery clutch.
love this little clutch, these fabrics are so gorgeous!
A very cute bag. That is a beautiful fabric. So fresh.
Love the little clutch. The outside zipper is neat.
I love the idea of an exposed zipper, maybe a bright, shiny metal one? The fabric is gorgeous.
I love bags and clutches of all kinds. Thanks for this pattern and the chance to win.
that is the nices bag I have seen. LOVE IT.
Love the clutch, nice job!
I LOVE the fabric – and especially the pattern. Haven’t attempted the zippers yet, but will try it now. Thanks for your great blog!
Neat clutch! Thanks for the pattern.
Love the tutorial ! Can’t wait to make my own bag! Thanks for the giveaway
Cute pattern and that zip……so neat. I love it.
I love this new Flora line. I’d make a big floor cushion cover from it.
I love the bright aqua fabric, such happy designs. x
Your clutch is gorgeous! Thanks for sharing.
Love everything about this! I’m a fairly new sewist, and have made a few simpler bags, but this adds details that make it stand out. I can’t wait to try it!
🙂
Adorable clutch–I “sew” have to make some of these!
I ADORE your clutch! Such pretty fabrics.
Darling bag. I don’t carry bags a whole lot. I have to carry around a diaper bag for now, but I will check out the tutorial for a later point in my life. I love this fabric. If I had it, I think I would use it as a start to a herringbone quilt for my mom. She would just love this fabric.
I use these little bags for so many things! Very pretty.
That fabric is gorgeous!
The perfect skill-builder! Shared your Poppy clutch on Crafts on Display today. I love how you teach inset zippers and fabric tabs on a small, manageable scale. Great work!